
10 Stunning Forest Photography Subjects (With Practical Tips!)


Have you ever felt the disappointment of being stunned by the serene beauty of standing among trees in a forest, yet the captured photo screamed cold green nightmare? If so, welcome to the club! Photographing forests is an art in itself—while forests can make you feel at peace so easily, capturing the feeling they transport can be challenging. They may seem uniform and complex at the same time. These natural spaces are rich with life, textures, and subtle contrasts, each layer of greenery telling its own story. Yet capturing the full essence of a forest isn’t straightforward. Forests present unique challenges: the lighting can shift dramatically from one moment to the next, shadows play on the forest floor while sunlight filters in sporadically through dense canopies, messing with the white balance of your camera (aka cold green nightmare), and the depth of the trees can make scenes feel overwhelming to frame.
However, with focus on the right details and techniques to transform the green nightmare on your screen into a whimsy daydream, it is possible to capture the forest's beauty. In both German & English (& of course probably other languages too), there is a saying that when someone does not see the obvious that is right in front of them, they don’t see the forest for the trees. And I think it is indeed often like this in the woods—there is so much going on, with trees being so prominently in the forefront that it is easy to overlook all the incredible details, or simply be overwhelmed by how to capture the apparent uniformity.
I hope this article will inspire you to take the camera to the forest by helping you find the details, and get photos you love that capture the unique vibe of the woods. So grab a cup of tea or coffee, and let’s dive in!
Tree Canopy (Frog's Perspective)
📷 Recommended Lens: Wide-angle, to capture the full expanse of the tree canopy from below.
⚙️ Camera Settings: Aperture between f/4–f/14; exposure time at least 1/focal length seconds (ideally shorter) for a stable photo; adjust ISO as needed for a sharp, well-lit image (see general tips below).
💡 Composition & Lighting: Lie or crouch down and look for a spot where the tree trunks stretch upward and meet in symmetrical patterns.

Redwoods and other tall trees make for beautiful photos from below—the way their trunks stretch skyward and seem to converge creates a stunning sense of symmetry.
Misty Scenes
📷 Recommended Lens: Wide-angle.
⚙️ Camera Settings: Aperture between f/4–f/14; exposure time at least 1/focal length seconds (ideally shorter) for a stable photo; adjust ISO as needed for a sharp, well-lit image (see general tips below)
💡 Composition & Lighting: Use tree layers and leading lines for depth. Mist is best early morning with soft backlight or diffused light through the forest.

I captured this photo after a rain in the black forest (Germany). I love how the sun makes the mist visible and the forest look so magical.
Sun Peeking Through The Trees (Starburst)
📷 Recommended Lens: Wide-angle or normal prime lens.
⚙️ Camera Settings: Small Aperture required (f/14–f/22), balance ISO & exposure time as needed for sharp & smooth photo (see general tips below).
💡 Composition & Lighting: Position yourself so that the sun is partically blocked with a tree or branch for defined rays and avoiding lens flares.

The sun is peeking through the dense forest. For this photo, a tripod was needed to avoid a blurry picture.
Tree Bark
📷 Recommended Lens: Macro or telephoto lens (90mm or longer).
⚙️ Camera Settings: Aperture f/4–f/8 depending on the depth of field you want — lower f-stops for more background blur; ISO & exposure time as needed for sharp & smooth photo (see general tips below)
💡 Composition & Lighting: Look for textures, patterns, and special features like the holes with the stashed acorns in this photo below.
It was fascinating to see this tree covered in holes filled with acorn stashes (Pinnacles National Park, California).
Spider Webs
📷 Recommended Lens: Macro or telephoto lens (90mm or longer).
⚙️ Camera Settings: Aperture f/4–f/14, ISO & exposure time as needed for sharp & smooth photo (see general tips below)
💡 Composition & Lighting: Early morning dew, backlighting and a contrasting background reveal the web’s intricate details best.

I captured this spider web, with its builder right in the center, in the redwood forests of Northern California.
Slugs, Snails & Snakes
📷 Recommended Lens: Macro or telephoto lens (90mm or longer).
⚙️ Camera Settings: Aperture f/4–f/14, ISO & exposure time as needed for sharp & smooth photo (see general tips below)
💡 Composition & Lighting: Soft, diffused light or shaded areas prevent glare on shiny bodies.


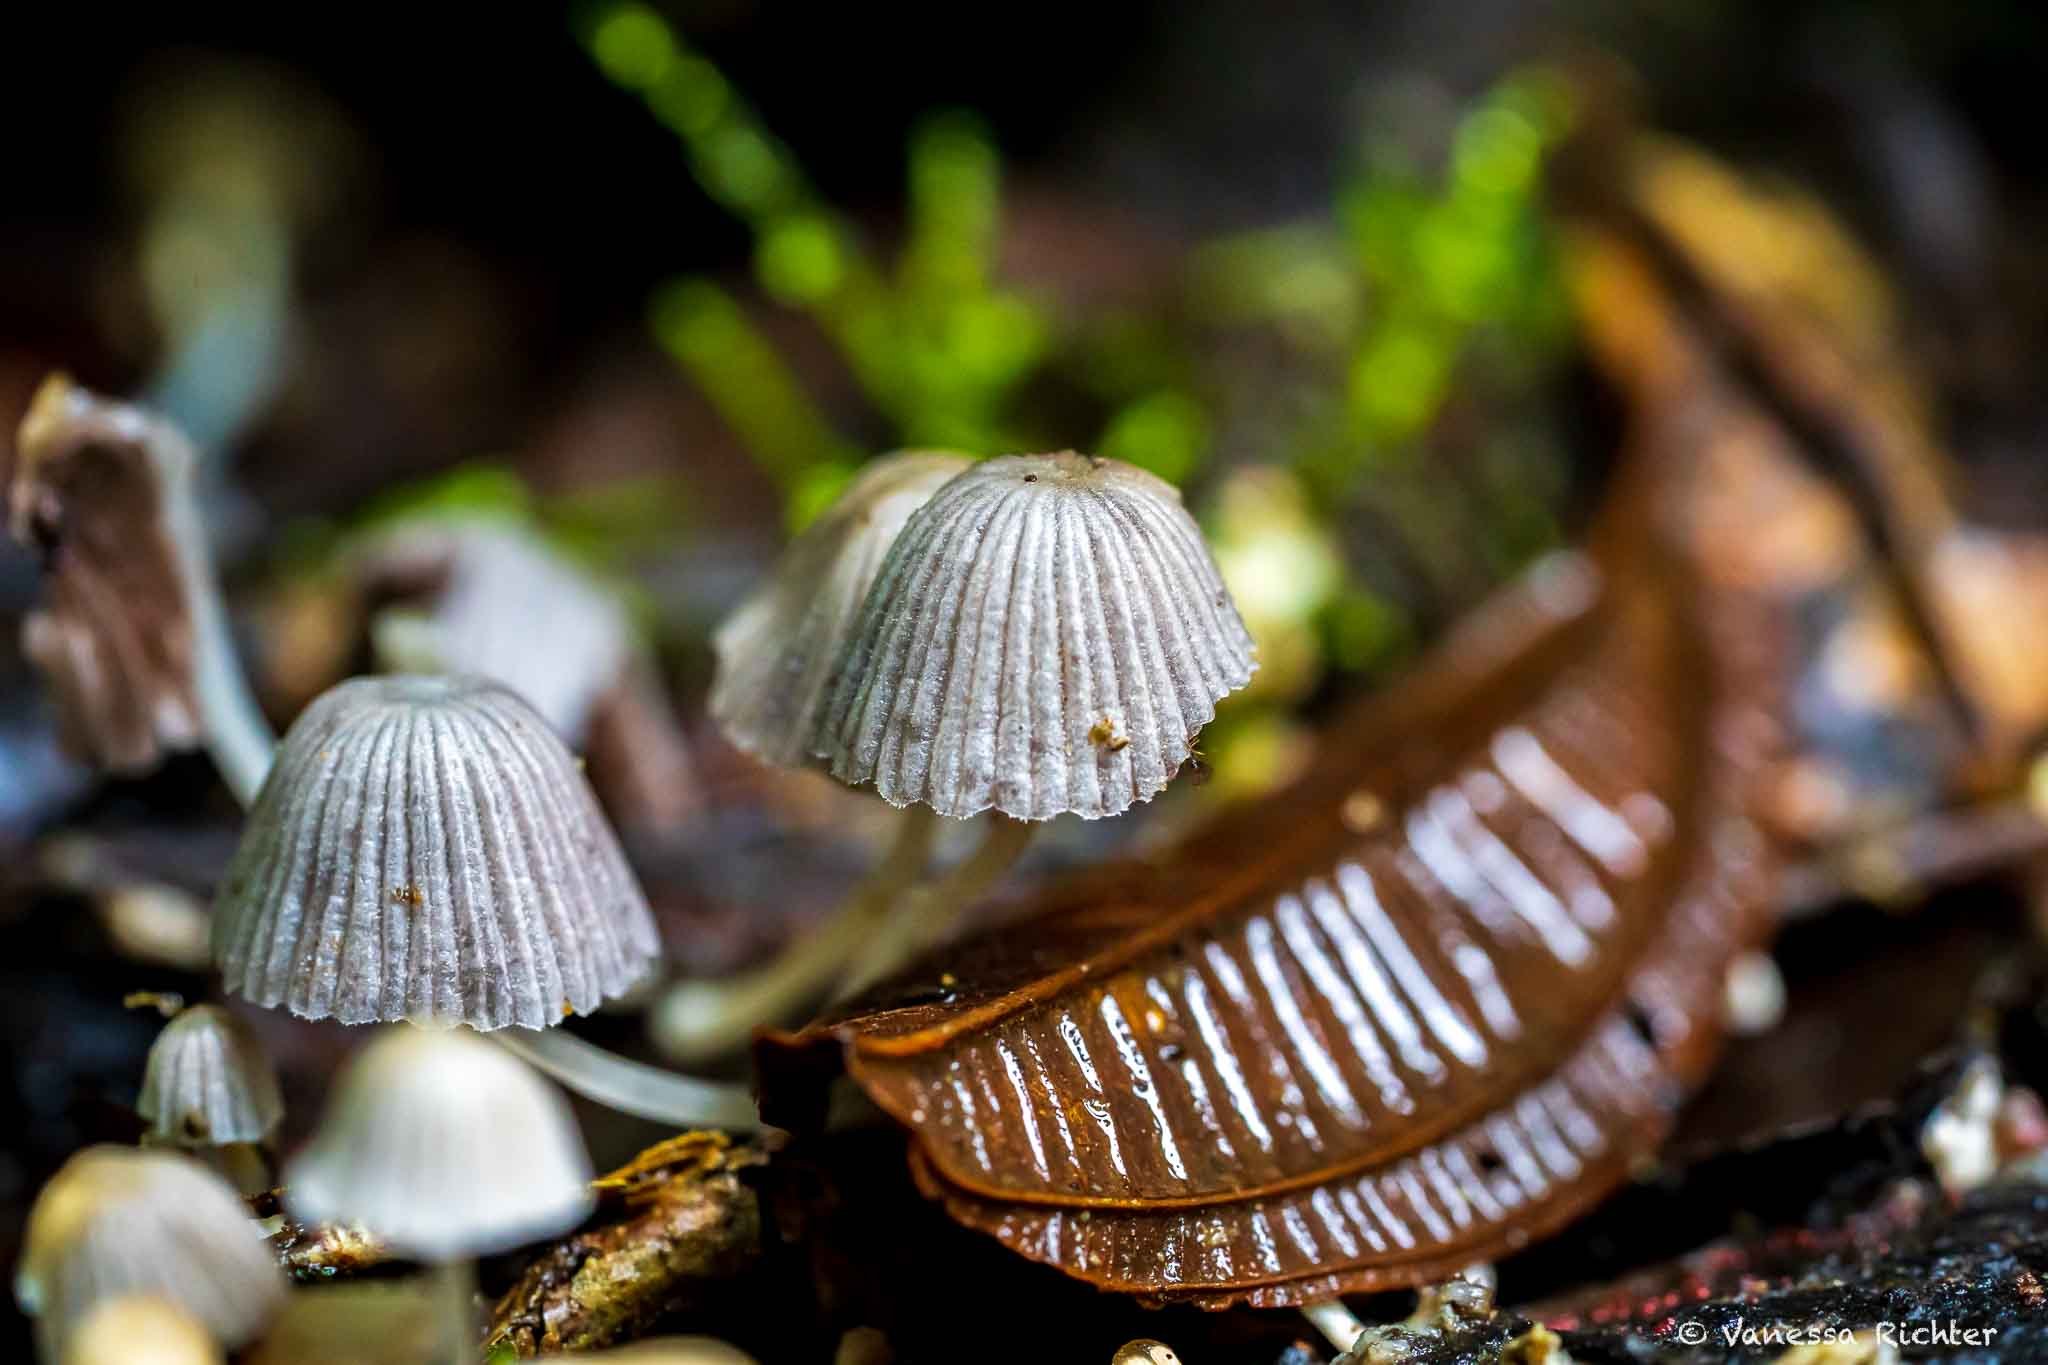
Mushroom Macros
📷 Recommended Lens: Macro or telephoto lens (90mm or longer)
⚙️ Camera Settings: Aperture f/4–f/8 depending on the depth of field you want — lower f-stops for more background blur; ISO & exposure time as needed for sharp & smooth photo (see general tips below)
💡 Composition & Lighting: Get low and shoot from the side or in bird perspective for an stunning view. After rain is ideal for moisture and mood.
Ferns Unfurling
📷 Recommended Lens: Macro or telephoto lens (90mm or longer).
⚙️ Camera Settings: Aperture f/4–f/8 depending on the depth of field you want — lower f-stops for more background blur; ISO & exposure time as needed for sharp & smooth photo (see general tips below)
💡 Composition & Lighting: Get low and focus on the slug’s texture. Soft, diffused light or shaded areas prevent glare on shiny bodies.
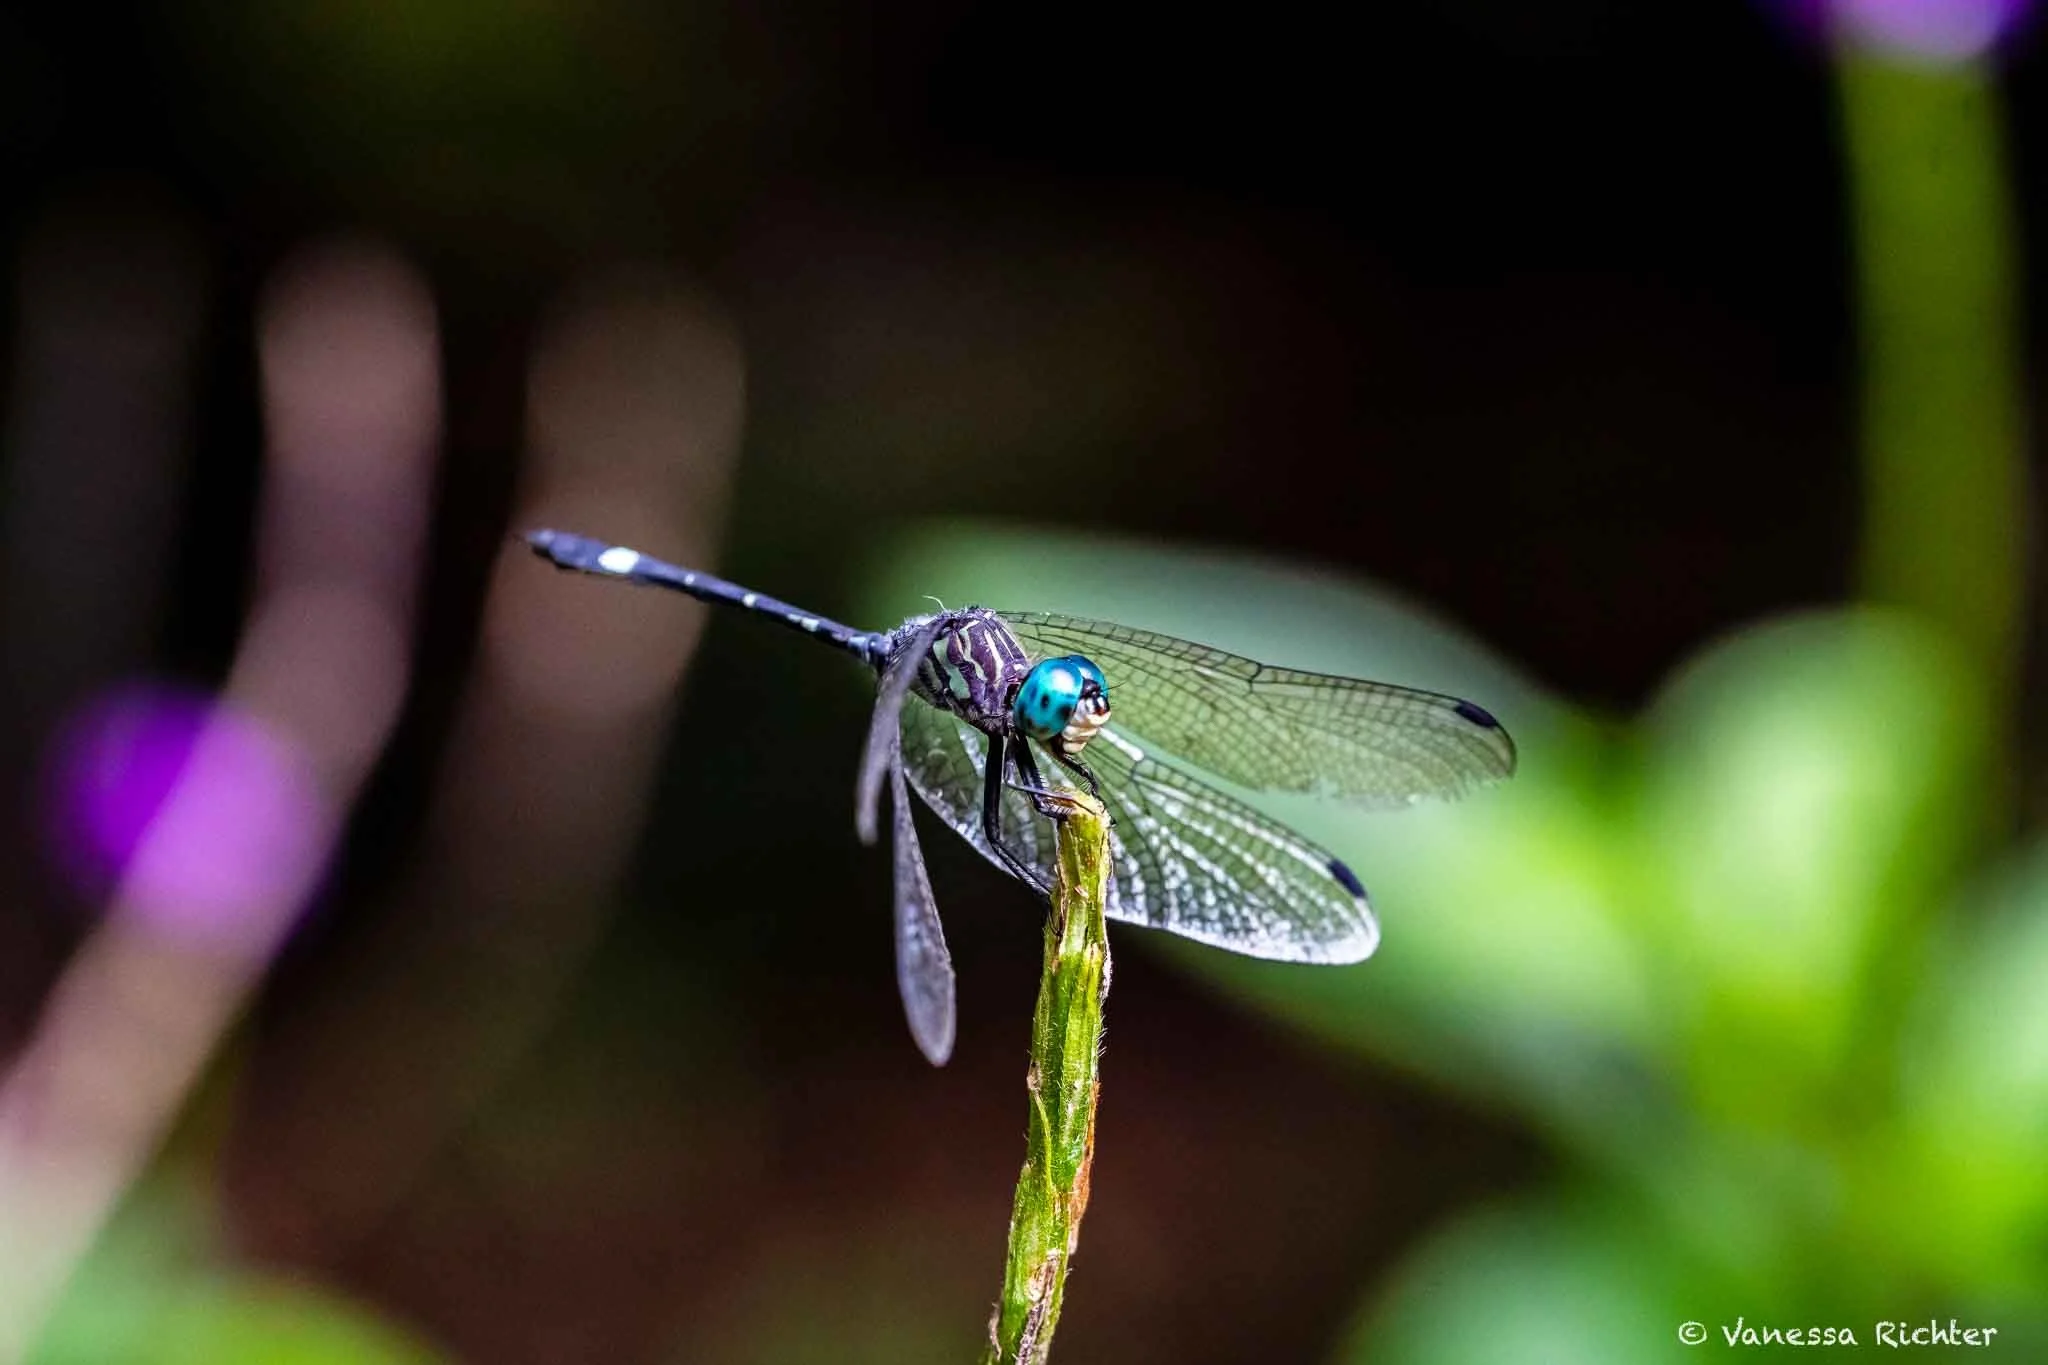
Close-Ups Of Insects (e.g. Dragonflies, Butterflies, Beetles, Ants At Work)
📷 Recommended Lens: Macro or telephoto lens (90mm or longer).
⚙️ Camera Settings: Aperture f/4–f/8, fast shutter speed 1/250s or higher depending on how fast the insect moves, ISO as needed (see general tips below).
💡 Composition & Lighting: Focus on the eyes or detailed features.
This dragonfly was sitting surprisingly still on a plant stalk in Corcovado National Park, Costa Rica.
Dew Drops on Moss
📷 Recommended Lens: Macro lens (~90mm or longer).
⚙️ Camera Settings: Aperture f/4–f/8; adjust ISO and exposure time as needed for a sharp, smooth photo (see general tips below).
💡 Composition & Lighting: Focus on single droplets or clusters. Early morning backlighting enhances sparkle and depth.

General Tips for Forest Shots
Gear Notes
- Macro Lens: If I could only take one lens to the forest, this would be it. There are so many incredible small plants and critters that can be best captured close and detailed! My absolute favorite: tiny mushrooms. Nothing seems more woodsy and whimsical to me.
- Smartphones: Many smartphones can capture great forest shots using wide-angle lenses, zoom, or portrait mode. For extremely close-up or distant subjects like mushrooms or insects, a DSLR or mirrorless camera will give much better detail, control, and quality though.
- Tripod: I typically manage without one, but sometimes the lighting can be so dim in a dense forest on an overcast day that you may need one if you don't want to compromise image quality. With a full-frame camera, the chances are better that it's fine without support because this type of sensor allows you to capture more light and make more detailed edits. Learn more about the two most common sensor types here.
Best Time
- Morning Light & Golden Hour: Light is softest during these times of day. However, I have taken many of the above pictures midday, and I actually think any time of day can be good in the woods! Forests filter a lot of sunlight, so the light that reaches the forest floor often functions more like a focused spotlight.
Settings & Editing
- Shoot in RAW: Always shoot in RAW if possible—it preserves all image data and gives you more flexibility when editing exposure, shadows, and highlights.
- ISO & Exposure Time: Adjust ISO and exposure time as needed for a sharp and smooth photo. Lower ISO gives cleaner images, but slower shutter speeds may require a tripod. If these terms don’t ring a super loud bell, get familiar with them in my guide here.
- White Balance: Forests often create tricky lighting, especially under dense canopy. If colors look too green or cool, adjust white balance during editing.
Creative Effects
- Starburst Effect: To capture the sun as a starburst, use a small aperture like f/16–f/22 and position the sun partially behind a branch or tree. Learn how to master starburst and other creative effects here.
Follow the Adventure
Latest on the Blog


Search
I’m the face, writer, and photographer behind Venture Beyond the Picture.
You’re in the right place if you’re looking for nature-focused travel guides, real tales from the trails, and photography that celebrates wild landscapes, fascinating wildlife, and the quiet beauty of nature.
I hope what you find here helps you plan your adventures across the Western U.S., capture the outdoors through your own lens, and spark new inspiration.