Milky Way Photography Guide for the Western US: When, where, Camera Settings & Gear Tips

I feel a tinge of fear in my bones as I step outside the little cabin. It is still warm, and it smells like desert sand, cooling down from the heat of the day. It is pitch dark, and even though I tried my best to avoid turning on the lights, I had briefly turned them on while moving from the bedroom to the front door. Now my eyes are adjusting to the darkness, and the longer I stand in the quietness of the night, the more I can see. More and more stars appear to my vision. They are countless and feel like millions of sparkling diamonds overhead. And there is something else: a whitish dust cloud-like shape hovers diagonally above the horizon, and its form is becoming clearer and clearer.

The core of the milky way stretches brightly over the desert in Nevada. The greenish airglow is visible above the horizon.

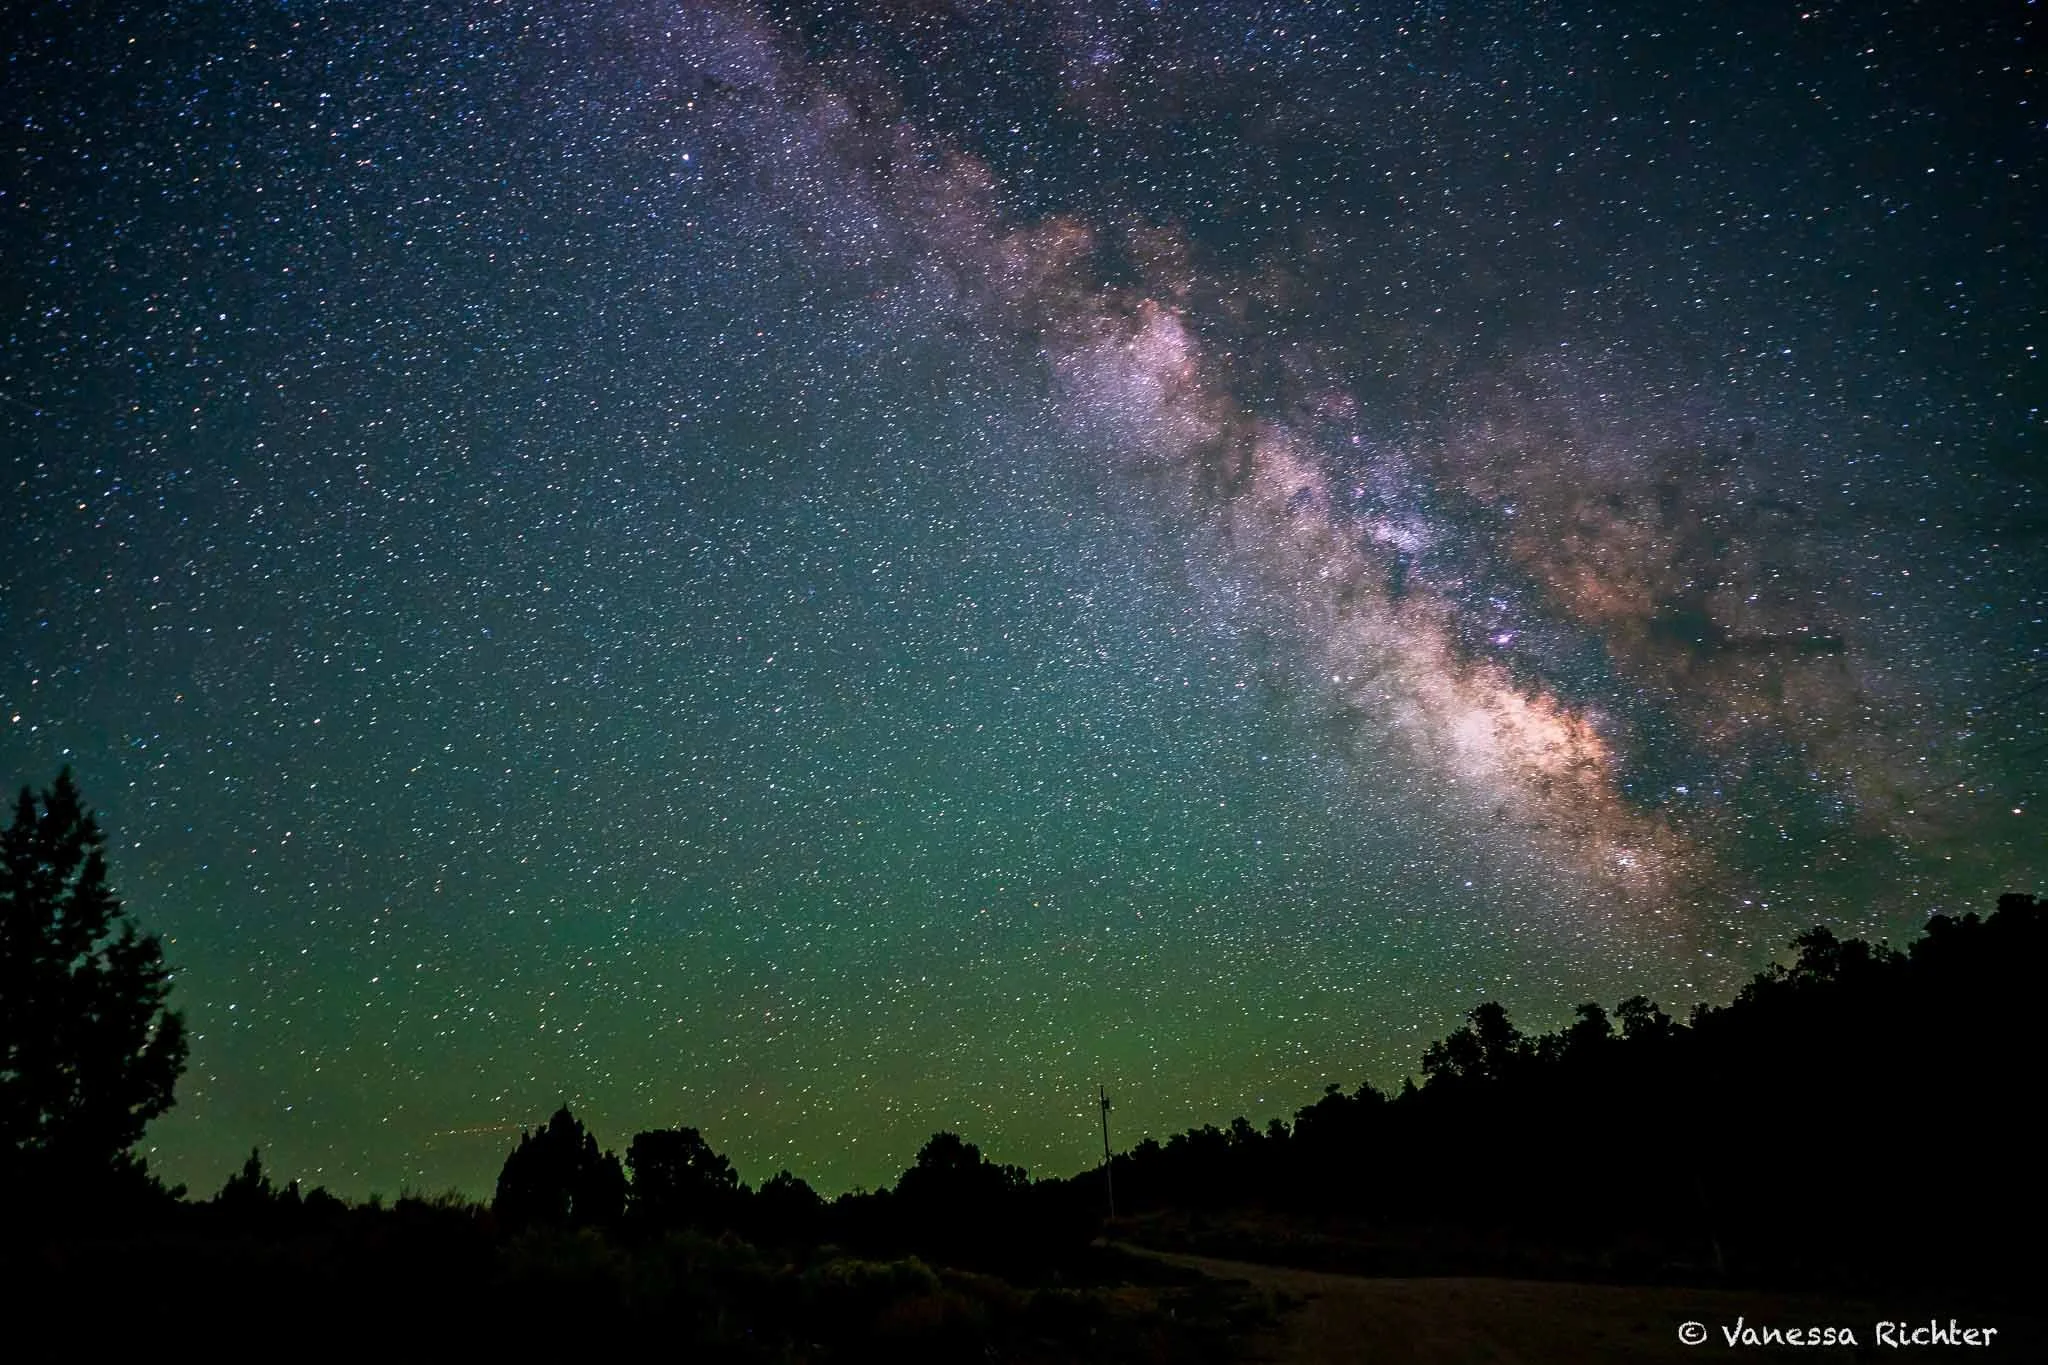
The Milky Way captured after moonset near Great Basin National Park in Nevada. Shot with a 20mm full-frame lens. Settings: ISO 1000, f/1.8, 30 seconds.

Observing the sparkling stars in the night sky at a truly dark place is an awe-inspiring experience. Most of us don’t have access to such dark night skies right outside our doors, but there are still many places in the world where one can gaze into a star-filled sky, with the Milky Way offering a glimpse into the beauty of the universe. If you’re ready to gaze up at a sky bursting with stars and capture the magic through your lens, you’re in exactly the right place!

In this article, I will cover everything you need to know to capture a great shot of our home galaxy. I’ll discuss the essential gear you’ll need to begin with, when and where to venture out to photograph it, and how to set up your camera to take a good shot once you have all your gear, the right place, and the right time.

Let’s dive in, shall we?


In a Nutshell: The Milky Way

What is a Galaxy?

Galaxies are vast systems consisting of stars, planets, and immense clouds of gas and dust, all held together by gravity. The largest galaxies can contain trillions of stars and stretch over a million light-years across. These celestial formations come in various shapes, primarily spirals and ellipticals, but also include irregular galaxies with less defined structures.

Most galaxies are ancient, ranging from 10 billion to 13.6 billion years old — i.e. some are nearly as old as the 13.8 billion-year-old universe itself! The youngest known galaxy emerged about 500 million years ago.

What Exactly Is the Milky Way?

The Milky Way is the galaxy where Earth resides — a spiral galaxy with a star-filled disk spanning over 100,000 light-years. Earth is located on one of its spiral arms, approximately halfway from the center. Just as Earth orbits the Sun, our solar system orbits the center of the Milky Way, completing an orbit roughly every 240 million years.

Hence, our view of the Milky Way is a glimpse from within the galaxy itself: when viewed from Earth, the central disk of our home galaxy appears as a faint, milky band of light stretching across the sky, which gives it its name.

The Milky Way is part of a local group of over 50 galaxies. These range in size from dwarf galaxies, containing up to a few billion stars, to the Andromeda Galaxy, our nearest large galactic neighbor.

Read more about galaxies and the Milky Way on NASA’s website.

How to Capture the Milky Way

Gear

First of all, let’s start with the gear you’ll need to capture the Milky Way in its full glory. There are three essential items you’ll need:

  • A Camera that allows you to shoot in fully manual mode.

    • Ideally, a full-frame camera, as these allow you to capture much more light and produce less noisy pictures, from which you can recover a lot of information from the raw images.

  • A Wide-Angle Lens Allowing For A Wide Open Aperture: The wide-angle lens will help in capturing the vastness of the Milky Way, and potentially an interesting landscape in the foreground.

    • Ideally, your wide-angle lens should be very light-sensitive, allowing for an aperture of f/2.8 or even wider.

  • A Sturdy Tripod: This will allow you to take long exposures.

In addition to these essentials, a few other items can be extremely useful:

  • A Red Light: As long as your eyes aren’t fully adapted to the dark, or if you get scared in the pitch dark, you may want to use a red light source to see your surroundings or camera settings. Red light is preferable because it won’t jeopardize your night vision.

  • A Stargazing App: An app with augmented reality view can help you figure out where exactly the Milky Way and other celestial objects are located. Such apps allow you to point your phone at the sky and see where stars, planets, and the Milky Way are.

  • Gloves: If you are shooting in cold conditions, gloves can be extremely helpful. Fingers can get freezing cold quickly if they’re constantly exposed to the cold air while you’re adjusting your camera position and settings. Gloves can help extend your shooting session comfortably.

📌 Pin for later

Where

In our world, dark skies have become a rare phenomenon, and only few people are lucky enough to live under truly dark night skies. Cities brighten up the skies for a large radius around them. Luckily, there are still many places in the world where you can find truly dark skies and get a peek into the massive universe around us.

So — How do you find places with no or very little light pollution?

Fortunately, there is a non-profit organization that concerns itself with dark skies and has the International Dark Sky Places (IDSP) program in place. This program “certifies communities, parks, and protected areas around the world that preserve and protect dark sites through responsible lighting policies and public education.” DarkSky International, formerly the International Dark-Sky Association (IDA), is based in the United States and certifies dark sky places worldwide. It was incorporated in 1988 by David Crawford, a professional astronomer, and Tim Hunter, a physician and amateur astronomer.

International Dark Sky Places by the IDA

There are currently five types of designation for International Dark Sky Places by the IDA: International Dark Sky Sancturies, Parks, Reserves, Communities and Places.

International Dark Sky Sanctuaries

The most remote (and often darkest) places in the world, whose conservation state is most fragile.

  • Eastern Lake County, regionally referred to as the “Oregon Outback” (southeastern Oregon)

  • The Lost Trail National Wildlife Refuge, located in Pleasant Valley, nestled in the Salish Mountains (northwestern Montana)

  • The Massacre Rim Wilderness Study Area (WSA), nestled between the Black Rock Desert-High Rock Canyon Emigrant Trails National Conservation Area (BRNCA) and the Sheldon National Wildlife Refuge (SNWR) (Nevada): one of the darkest places not only in Nevada but also the contiguous United States!

  • Medicine Rocks State Park (Montana)

International Dark Sky Parks

Publicly or privately owned conservation areas that implement good outdoor lighting and provide dark sky programs.

This includes a range of national and state parks, as well as monuments and recreation areas, across the Western United States, including, for example, Death Valley, Grand Canyon, and Joshua Tree National Parks.

The other categories include:

  • International Dark Sky Reserves: “Dark “core” zones surrounded by a populated periphery where policy controls protect the darkness of the core.”

  • International Dark Sky Communities: “Urban sites that promote an authentic nighttime experience despite being in the midst of significant artificial light.”

    and

  • Urban Night Sky Places: “Cities and towns with quality outdoor lighting ordinances that educate residents about the importance of dark skies.”

Map and Description

The map includes the most preferable dark sky categories: Dark sky sanctuaries (purple) as well as parks (blue) designated as international dark sky parks in the Western United States. Please note that for simplicity and a better overview, I have only included National Parks in the parks category (i.e., State Parks or other areas are not mapped here).

A full list of places can be found on the official IDA website.

Lightpollution Map & Bortle Classification

In addition to using the International Dark-Sky Association (IDA) classifications, it's worthwhile to research locations independently. There are places not officially designated as dark sky places, yet they offer good to ideal night sky conditions for capturing the Milky Way.

The milky way in the night sky in yosemite national park, california. Trees line the foreground.

Yosemite National Park is a good example of this—it does not have official dark sky status, but from personal experience and according to its Bortle class (which I will explain shortly), light pollution is minimal, allowing for great Milky Way visibility and photography.

Note: Compared to the picture at the beginning of the article, the Milky Way appears less pronounced. There are several reasons for this. This location is not free from light pollution (Bortle class 2 vs. 1). Additionally, a bigger factor might have been that the first picture was taken with a full-frame camera, which captures much more information than the APS-C sensor camera I used for this picture.

Settings: ISO 1600, 11mm, 25 sec, f/2.8.

There is a great mapping application available that visualizes light pollution worldwide based on data from the Visible Infrared Imaging Radiometer Suite (VIIRS) or World Atlas 2015 zenith brightness data (you can also view information on other phenomena like auroras). The map displays the level of light pollution in individual places, which also shows impressively how cities illuminate the night sky over long distances.

In addition to visualizing light pollution, the application provides Bortle class ratings for locations, ranging from 1 (Excellent dark-sky site) to 9 (Inner-city sky). Locations up to Bortle class 3 offer good conditions for Milky Way photography. Above this, the Milky Way remains visible but with decreasing clarity (class 4) and becomes barely or not visible at all from class 5 onwards.

Examples

The pictures below show the light pollution map (based on the World Atlas Data 2015) and information for two places on either end of the light pollution spectrum: The Great Basin National Park in Nevada, as an example of one of the most remote places in the United States, and San Francisco, as an example of a major city. As you can see, there is no light pollution in or around the national park itself, making it a great location for stargazing and photographing the Milky Way. San Francisco, on the other hand, has city lights shining brightly in a large radius around the city (and in addition, SF is not the only city in this area), which makes it impossible to see or photograph the Milky Way. However, you could go north to Point Reyes—it is more light-polluted than Great Basin, but categorized as a Bortle Class 3, so you will be able to see the Milky Way with some complexity (if there is no fog or clouds). Generally, dark blue or no color hued areas are excellent places for night sky photography, with yellow hued places being the upper bound that already exhibit limited abilities to see the Milky Way properly.

When

In addition to understanding how to use your camera to capture the awe-inspiring Milky Way and if a place generally is a good fit, it is essential to know when to leave the comfort of your cozy bed and venture out into the pitch dark to get a shot of it. There are essentially four factors to consider: time of year and day, the moon, and the weather.

Time of Year & Day

  • Visibility Window: In the Northern Hemisphere, the core of the Milky Way is only visible from around February to October. The further north you go, the shorter this period becomes, while the further south you go, the longer the visibility window.

  • Time of Night: The Milky Way's visibility varies throughout the year:

    • February to May: The Milky Way core is visible in the early morning hours, typically after midnight.

    • (Mid) June to August: The Milky Way core is visible most of the night. The galactic core is high in the sky during these months, providing the best viewing opportunities.

    • September & October: The Milky Way core is visible in the evening and sets before midnight. As the year progresses, the core sets earlier in the night.

Moon

  • Moon Phase: Aim to photograph the Milky Way during a new moon or when the moon has set. This ensures the sky is as dark as possible, which helps in capturing the faint details of the Milky Way.

  • Moonset Timing: The time of moonset varies throughout the year. Generally, the moon sets later in the evening during the first and last quarters and earlier in the evening around the full moon. Use a lunar calendar, such as the one here, to check the specific moonset times for your location.

Examples

Left picture: After moonset around 1 am at the beginning of June (Bortle class 1 ). You can even see the greenish airglow just above the horizon.

Right picture: Before moonset around 10:30 pm the same night, just a few days after the new moon. You can see that the Milky Way is well visible, yet even with a slim moon, it does not pop out as much as in the left picture after moonset. Here, the airglow is not visible at all.

Weather

  • Clear Skies: Clear, cloudless skies are essential for Milky Way photography. Check the weather forecast to ensure there is no cloud cover or atmospheric haze that could obstruct your view of the night sky.

📌 Pin for later

Camera Settings

To adequately capture the Milky Way, it is essential to photograph in full manual mode. Night photography poses unique challenges that automatic or semi-automatic settings cannot handle effectively. Here are the key settings to consider:

Manual Focus

To capture a sharp photo of the Milky Way, you need to focus manually and set it to infinity or near it, using the focus ring on your camera. The sharpest focus may be precisely at infinity, or you might need a slight adjustment for optimal sharpness, depending on your camera. Verify this by zooming in on the brightest stars in live view mode to ensure they appear sharp.

Exposure Time

Use long exposures, typically between 20-30 seconds, to capture sufficient light. Due to the Earth's rotation, stars appear to move across the sky during long exposures. This movement can result in star trailselongated streaks instead of pinpoints of light. The exact maximum exposure time that avoids noticeable star trails depends on factors such as your lens's focal length and the camera's sensor resolution.

To determine that mathematically instead of (or in addition to) empirically, you can use the 500/600 Rule to determine the maximum exposure time before star trails become apparent:

Astrophotography Rule Calculator

500/600 Rule Calculator

Enter the focal length of your lens in mm:

Enter the crop factor of your camera (e.g., 1.5 for APS-C, 1 for full frame):

For example, with a 20mm lens on a camera with a full-frame sensor, dividing 500 or 600 by 20 and then multiplying by 1 (the crop factor of the sensor, no conversion needed in this case) equals 25 or 30 seconds. This indicates that exposures between 25 and 30 seconds are possible while keeping star trails minimal.

Aperture

Open the aperture as wide as possible (low f-number, ideally f/2.8 or wider) to maximize the amount of light reaching the sensor.

ISO

Adjust ISO sensitivity to achieve proper exposure without introducing excessive noise, typically between 1000 and 3200. This depends on the exposure time (longer exposures require a lower ISO) as well as the aperture (wider apertures/smaller f values require a lower ISO). The lower the ISO is set, the less noise or graininess is introduced to the picture.

Note: In my experience, an ISO above 1600 can already cause noticeable noise when using a camera with an APS-C sensor.

Shutter Delay

To avoid any shaking, it is best to set a shutter delay of 2 or more seconds so that pressing the shutter button does not already cause a blurry picture.

File Format — Raw versus JPEG

In challenging lighting situations, which are typically encountered in night photography, adjustments such as reducing bright lights, brightening dark areas, or minimizing noise are frequently necessary. Shooting in RAW format is essential in such cases! Unlike JPEG, RAW files retain all the original data captured by the camera without any processing applied. This gives you full control over editing, allowing for more natural and high-quality results compared to camera-edited JPEGs. If you find post-editing daunting, it's not as complicated as it seems! I typically use Lightroom for this purpose. Here, you can start by letting the program automatically adjust the photo — this usually provides a solid foundation for further edits.

📌 Pin for later

Summary

Gear

Essential

  • Tripod to prevent shaking

  • Camera capable of fully manual shooting

  • Wide-angle lens

Extremely helpful

  • Stargazing app

  • Red light for preserving night vision

  • Gloves for cold weather

Where

  • Choose locations designated as dark sky places by the IDA, or:

  • Refer to the Bortle Scale (preferably class 1 or 2).

When

  • Milky Way Season in the Northern Hemisphere is between March and October.

  • Check a lunar calendar and aim to shoot during a new moon or after moonset.

  • Check the weather forecast — clear skies are essential.

Key Camera Settings

  • Use a wide-open aperture (f/2.8 or wider).

  • Set a long exposure time (typically 20-30 seconds). To avoid star trails, use the 500/600 Rule to determine the maximum exposure time.

  • Adjust ISO (typically 1000-3200) to balance brightness and noise. Lower values introduce less noise.

  • Use a 2-second shutter delay.

  • Focus manually (adjust focus ring to or close to infinity) for crisp details.


I’d Love to Hear from You

Have you had the chance to photograph the Milky Way yet? Do you have any favorite places or additional tips to share?

Share your thoughts and experience in the comments below!

Follow the Adventure


Latest on the Blog


Search

Previous
Previous

10 Stunning Forest Photography Subjects (With Practical Tips!)

Next
Next

Full Frame or Crop Sensor Camera? Ultimate Guide for Nature & Travel Photography